Turbofan:Compressor: Difference between revisions
→Resources and references: adding notes on propulsion |
|||
| (17 intermediate revisions by the same user not shown) | |||
| Line 1: | Line 1: | ||
=Compressor design= | =Compressor design= | ||
Real-world engines | '''Pictures on this page are outdated and do not reflect the actual compressor design (text is not up-to-date either)'''. | ||
Several properties of axial compressors should be considered: | |||
* a constant energy rise should happen between each stage. It is sometimes said that the temperature should have a constant rise, instead of the energy (entropy, based on both pressure and temperature). The direct implication of those two concerns is that each stage has to have a lower compression ratio than the previous, since its input flow properties have already been risen. The first stage will thus have the highest pressure rise. | |||
* the axial air flow velocity in the compressor should be constant. Since dynamic pressure is traded for static pressure, if the cross-section area is kept constant, the flow speed falls. That's why the area containing the flow in the compressor decreases along stages. | |||
* maximum pressure rise for a '''subsonic''' compressor is around 1.6:1. Since we tend towards a singe-spool engine, and the fan should not be several times supersonic, the compressor is likely to be subsonic. | |||
From these three concerns, a 4 stages compressor with the following stage pressure ratios: 1.55, 1.52, 1.47, 1.41; would have a pressure ratio of 4.88, which is terrible. A fifth stage with 1.35 PR would make a final PR of 6.59... | |||
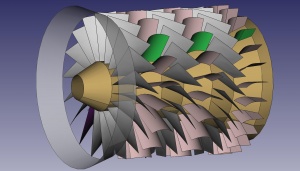
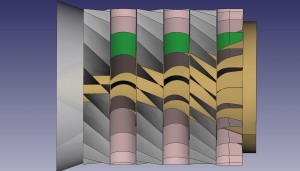
Real-world engines have 10 to 20 compression stages. We will first design a 3- to 5-stage compressor, in a single-spool engine and assess if more stages are required (= more expensive). [[Turbofan:Blades|Blade design and manufacturing]] have a dedicated page. The two pictures below show an overall sketching of the compressor with all its blades, flat rendered, but will be updated to be airfoil rendered someday if we can find how to draw it. Both rotor and stator will have an expander and reaction design. | |||
[[File:Compressor_noshell.jpg|300px]] [[File:Compressor_side.jpg|300px]] | |||
The three stages depicted here have the following number of blades (same for rotor and stator of the same stage): | |||
* Stage1: 18 blades (20° spaced) | |||
* Stage2: 20 blades (18° spaced) | |||
* Stage3: 24 blades (15° spaced) | |||
==Blade designs== | |||
Blade design is closely related to the rotating speed, especially their incidence and deviation angle. The following picture is well known in the compressor or turbine blading world and depicts the velocity triangle. As blades rotate, they both undergo the air flow of the compressor and of their rotation's apparent wind. The triangle allows to calculate the effective air flow direction at rotor input and discharge, and to align stator blades accordingly. | |||
[[File:Velocity_triangles.png|300px|center]] | |||
==Rotor design== | ==Rotor design== | ||
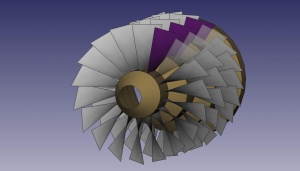
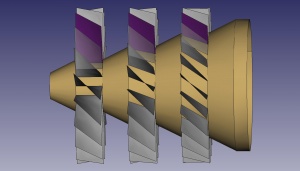
The following pictures represent the shaft and the three stages compressor rotor blades. | |||
[[File:Rotor_front_side.jpg|300px]] [[File:Rotor_side.jpg|300px]] | |||
Special manufacturing and balancing care have to be given to the rotor, since it will spin at very high rotation speeds. | |||
A blade mounting failure will likely cause the loss of the aircraft, given the constraints. The part that holds the blades is called the '''hub'''. We'll call the part of the blades that is hold by the blades at their root the '''insert'''. | |||
===Fan and compressor's first stage blades mounting=== | |||
For the first compressor stage and the fan, blades are long enough to have a root parallel to the shaft. An innovative design for the hub would be to a use spacer part between each blade. The whole compressor stage fixation would be the result of all blades and spacer put together side by side. It would be like a pie chart, in which separations are the blades' inserts. This design is probably not used on real planes for two reasons: it's more heavy, since the inside of the compressor stage/shaft is full of metal, and it's too complicated for higher stages as we will see below. This design is depicted below. | |||
[[File: | [[File:Blade_fixation_simple.jpg|300px|center]] | ||
An alternative design would be to have the blades moving freely from the hub, and when assembled, a key of some sort would fix them on the hub. The hub and the blades would have a notch in the same place, in which a ring-shaped key would place to hold everything together. This keyed design is also considered for higher stages, and is illustrated in the models below. | |||
===2nd and 3rd stage's compressor blade close-up and manufacturing=== | ===2nd and 3rd stage's compressor blade close-up and manufacturing=== | ||
Higher stages have shorter blades, and need to have the base of the blade non-parallel to the shaft for their twisting to be acceptable. That brings problems to the design and manufacturing of the blade insert and the hub: creating a part that can be duplicated to form a cylinder, but with a non-parallel-to-the-axis separation. | |||
We propose a more usual solution to this problem, based on a real standalone hub in which are milled the inserts holes. Blades' inserts would remain a linear part and the milling of the hub would thus be linear too. Since it's a round part, this makes a strange effect, but allows the blades to be properly and easily fixed. A keyed design could also be added on the extremities of the blades, i.e. the side of the hub. The pictures below represent this mounting system, in exploded view (larger versions available). The hub is the grey round part with only one insert milled in it, the yellow part is the inter-stage spacer that has the key holding the blades. | |||
[[File:Interblade1.jpg|300px]] [[File:Interblade2.jpg|300px]] | |||
Below is a close-up on the blades mounted on the hub (in orange) and on the key system from the inter-stage spacer (in yellow). | |||
[[File:Blade_fixation1.jpg|300px]] [[File:Blade_fixation2.jpg|300px]] | |||
==Stator design== | ==Stator design== | ||
The stator will have as main issue the fact that blades must have a very thin insert. Shaping them like a T should be considered, but bolting them on the stator looks more promising for now. | |||
[[File:Stator_side.jpg|300px]] [[File:Stator_front.jpg|300px]] | |||
==Resources and references== | |||
===Documentation on axial flow compressors=== | |||
* The chapter "Axial-Flow Compressors" from Meherwan P. Broyce is a nice way to get started with axial compressor design ([http://www.netl.doe.gov/technologies/coalpower/turbines/refshelf/handbook/2.0.pdf pdf]). | |||
* Notes from the School of Aerospace Engineering (Georgia Institute of Technology) AE4451 Propulsion, Winter/ Spring 2002 ([http://www.adl.gatech.edu/classes/propulsion/prop12.html html]). | |||
===Aerofoil analysis programs=== | |||
* A list of existing programs for aerofoil analysis and design is available [http://forums.x-plane.org/index.php?showtopic=54036 here]. | |||
* Free and quality software from that list seem to be [http://web.mit.edu/drela/Public/web/xfoil/ XFOIL] and [http://www.desktop.aero/panda.php PANDA]. | |||
[[Category:Turbofan|Compressor]] | |||
Latest revision as of 00:47, 28 November 2011
Compressor design
Pictures on this page are outdated and do not reflect the actual compressor design (text is not up-to-date either).
Several properties of axial compressors should be considered:
- a constant energy rise should happen between each stage. It is sometimes said that the temperature should have a constant rise, instead of the energy (entropy, based on both pressure and temperature). The direct implication of those two concerns is that each stage has to have a lower compression ratio than the previous, since its input flow properties have already been risen. The first stage will thus have the highest pressure rise.
- the axial air flow velocity in the compressor should be constant. Since dynamic pressure is traded for static pressure, if the cross-section area is kept constant, the flow speed falls. That's why the area containing the flow in the compressor decreases along stages.
- maximum pressure rise for a subsonic compressor is around 1.6:1. Since we tend towards a singe-spool engine, and the fan should not be several times supersonic, the compressor is likely to be subsonic.
From these three concerns, a 4 stages compressor with the following stage pressure ratios: 1.55, 1.52, 1.47, 1.41; would have a pressure ratio of 4.88, which is terrible. A fifth stage with 1.35 PR would make a final PR of 6.59...
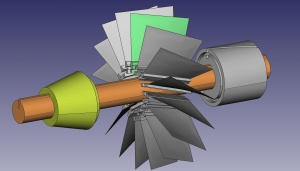
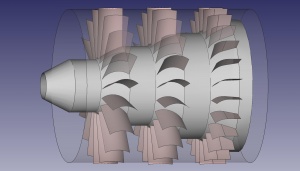
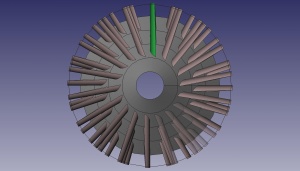
Real-world engines have 10 to 20 compression stages. We will first design a 3- to 5-stage compressor, in a single-spool engine and assess if more stages are required (= more expensive). Blade design and manufacturing have a dedicated page. The two pictures below show an overall sketching of the compressor with all its blades, flat rendered, but will be updated to be airfoil rendered someday if we can find how to draw it. Both rotor and stator will have an expander and reaction design.
The three stages depicted here have the following number of blades (same for rotor and stator of the same stage):
- Stage1: 18 blades (20° spaced)
- Stage2: 20 blades (18° spaced)
- Stage3: 24 blades (15° spaced)
Blade designs
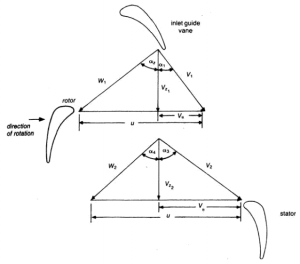
Blade design is closely related to the rotating speed, especially their incidence and deviation angle. The following picture is well known in the compressor or turbine blading world and depicts the velocity triangle. As blades rotate, they both undergo the air flow of the compressor and of their rotation's apparent wind. The triangle allows to calculate the effective air flow direction at rotor input and discharge, and to align stator blades accordingly.
Rotor design
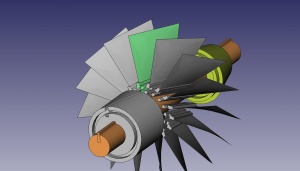
The following pictures represent the shaft and the three stages compressor rotor blades.
Special manufacturing and balancing care have to be given to the rotor, since it will spin at very high rotation speeds.
A blade mounting failure will likely cause the loss of the aircraft, given the constraints. The part that holds the blades is called the hub. We'll call the part of the blades that is hold by the blades at their root the insert.
Fan and compressor's first stage blades mounting
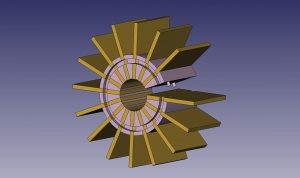
For the first compressor stage and the fan, blades are long enough to have a root parallel to the shaft. An innovative design for the hub would be to a use spacer part between each blade. The whole compressor stage fixation would be the result of all blades and spacer put together side by side. It would be like a pie chart, in which separations are the blades' inserts. This design is probably not used on real planes for two reasons: it's more heavy, since the inside of the compressor stage/shaft is full of metal, and it's too complicated for higher stages as we will see below. This design is depicted below.
An alternative design would be to have the blades moving freely from the hub, and when assembled, a key of some sort would fix them on the hub. The hub and the blades would have a notch in the same place, in which a ring-shaped key would place to hold everything together. This keyed design is also considered for higher stages, and is illustrated in the models below.
2nd and 3rd stage's compressor blade close-up and manufacturing
Higher stages have shorter blades, and need to have the base of the blade non-parallel to the shaft for their twisting to be acceptable. That brings problems to the design and manufacturing of the blade insert and the hub: creating a part that can be duplicated to form a cylinder, but with a non-parallel-to-the-axis separation.
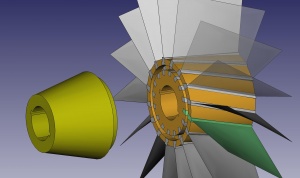
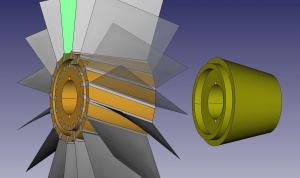
We propose a more usual solution to this problem, based on a real standalone hub in which are milled the inserts holes. Blades' inserts would remain a linear part and the milling of the hub would thus be linear too. Since it's a round part, this makes a strange effect, but allows the blades to be properly and easily fixed. A keyed design could also be added on the extremities of the blades, i.e. the side of the hub. The pictures below represent this mounting system, in exploded view (larger versions available). The hub is the grey round part with only one insert milled in it, the yellow part is the inter-stage spacer that has the key holding the blades.
Below is a close-up on the blades mounted on the hub (in orange) and on the key system from the inter-stage spacer (in yellow).
Stator design
The stator will have as main issue the fact that blades must have a very thin insert. Shaping them like a T should be considered, but bolting them on the stator looks more promising for now.
Resources and references
Documentation on axial flow compressors
- The chapter "Axial-Flow Compressors" from Meherwan P. Broyce is a nice way to get started with axial compressor design (pdf).
- Notes from the School of Aerospace Engineering (Georgia Institute of Technology) AE4451 Propulsion, Winter/ Spring 2002 (html).
